To paint a basketball court, start by prepping the area and measuring the court lines. Next, tape off the desired markings and apply the paint.
Finally, remove the tape and add any additional border lines. Acrylic paint is recommended for outdoor basketball courts, as it provides a non-slip texture and is designed for use on asphalt, concrete, and existing acrylic surfaces. When choosing a color, green is the most popular choice, often with blue accents.
While spray paint can be used, it is recommended to use a roller or brush for a more even application.
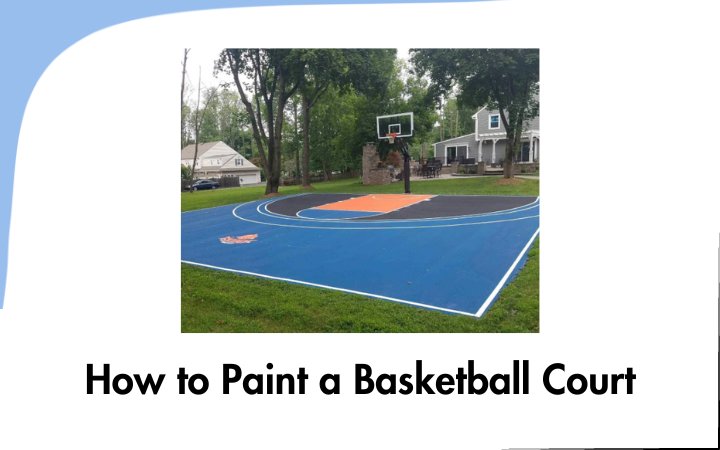
How to Paint a Basketball Court
Painting a basketball court is a meticulous process that involves careful planning and precise execution to create a smooth and vibrant playing surface. First, you need to prepare the court by cleaning it thoroughly, removing any debris, dirt, or loose paint. Next, outline the court’s boundaries, including the baseline, free-throw line, three-point arc, and center circle, using chalk or specialized court marking tape.
Once the lines are marked, apply a quality acrylic court paint, typically in the colors of your choice, using a roller or a sprayer for larger areas. Ensure that the paint is even and consistent to maintain a professional appearance. Finally, let the paint dry completely before adding any finishing touches, such as logos or additional lines. Properly painting a basketball court not only enhances its aesthetics but also contributes to player safety and overall game enjoyment.
Getting Started
To paint a basketball court, the first step is to choose the location where you want to paint the court. Consider factors such as space availability, accessibility, and lighting. Once you have chosen the location, gather the necessary supplies for painting the court. This may include acrylic paint, paint brushes or rollers, painter’s tape, and a measuring tape.
Before painting, it is important to prepare the surface properly. Clean the area and remove any debris or dirt. If the surface is rough or uneven, you may need to fill in any cracks or holes and sand down any rough areas. Apply a primer if necessary and let it dry before moving on to paint.
When it comes to choosing the paint, acrylic paint is commonly used for basketball courts. It is designed for use on concrete or asphalt surfaces and provides a non-slip texture. Apply the paint evenly, using a brush or roller, and follow any specific instructions provided by the paint manufacturer. Finally, let the paint dry completely before allowing any activity on the court.
Measuring And Taping
When it comes to painting a basketball court, proper measuring and taping are crucial steps. Determining the dimensions of the court requires the use of a measuring tape and chalk to mark the boundaries. It is important to accurately measure the length and width of the court to ensure it meets regulation size. Once the measurements are determined, taping off the lines for the court is necessary. This can be done using painter’s tape or specialized court marking tape. Care should be taken to ensure the lines are straight and properly aligned. Taking the time to measure and tape the court correctly will result in a professional-looking basketball court that is ready for play.
Applying The Paint
When it comes to painting a basketball court, choosing the right type of paint is crucial. Acrylic paint is the most commonly used paint for sports courts, as it is designed for use over asphalt, concrete, and existing acrylic surfaces. It is fortified with graded silica sands, providing a non-slip texture that enhances player safety.
Mixing the paint according to the instructions is important to ensure the desired consistency and coverage. Whether using rollers or paint sprayers, it is essential to apply the paint evenly on the court surface. This will result in a professional-looking finish that not only enhances the court’s aesthetics but also prolongs its lifespan.
Adding Border Lines
To add border lines to a basketball court, you need to start by taping off and then painting the lines. The key is to ensure that the lines are straight and clean. You can achieve this by using a laser level or a long straight board as a guide. Make sure to measure the distance between the lines accurately and use painter’s tape to mark them. Once you’ve painted the lines, allow the paint to dry completely before removing the tape to avoid smudging or smearing. This will give you crisp and professional-looking border lines that will enhance the appearance of your basketball court.
Marking The Court Lines
| Marking the Court Lines |
| When painting a basketball court, one of the first steps is to measure and mark the center line. This line divides the court into two equal halves and serves as a reference point for positioning other lines. |
| Creating the three-point line and free throw line is another important aspect of marking the court lines. These lines determine the boundaries for scoring shots and free throw attempts. |
| Painting the key and half-court line completes the court markings. The key is the rectangular area under the basket, and the half-court line is the line that divides the court into two halves. |
Joining Curves
To join curves when painting a basketball court, it is recommended to use a flexible ruler. This tool allows you to create smooth and accurate curved lines with ease. Start by measuring and marking the desired curve on the court using the ruler. Then, carefully apply the paint along the marked curve, ensuring that the shape is maintained. Take your time and apply the paint evenly to achieve the desired effect.
Removing The Tape
To remove the tape after painting a basketball court, it is important to wait for the paint to dry completely. This ensures that the tape does not pull off any wet paint along with it. Slowly and carefully, peel off the tape, making sure to pull it at a slight angle to avoid any damage to the painted lines. If there are any areas that need touch-ups, use a small brush and matching paint to fix them. It is important to take your time and be gentle when removing the tape to achieve clean and crisp lines.
Finishing Touches
| Inspecting the court for any imperfections: Before starting to paint a basketball court, it is essential to carefully inspect the area for any imperfections. Look for cracks, uneven surfaces, or any other issues that may need to be fixed before painting. |
| Adding any additional markings or designs: Once the main court lines are painted, you can consider adding additional markings or designs to enhance the look of the basketball court. These can include three-point lines, logos, or team names. Just make sure to carefully plan and measure before adding any extra markings. |
| Cleaning up the area and ensuring proper maintenance: After painting the basketball court, it’s crucial to clean up the area and ensure proper maintenance. This includes removing any paint spills or drips, clearing debris, and regularly sweeping or power washing the court to keep it in optimal condition. |
Frequently Asked Questions Of How To Paint A Basketball Court
What Kind Of Paint Do You Use On A Basketball Court?
Acrylic paint is commonly used on basketball courts, providing a non-slip texture and suitable for asphalt, concrete, and existing acrylic surfaces. The recommended color is green, often with blue accents for outdoor courts.
What Paint To Use On Outdoor Concrete Basketball Court?
For an outdoor concrete basketball court, use acrylic paint for best results. It provides non-slip textures and can be used on asphalt, concrete, and existing acrylic surfaces.
What Color Should I Paint My Basketball Court?
The most popular colors for a basketball court are green and blue, often with blue accents for outdoor courts.
Can You Spray Paint A Basketball Court?
Yes, you can spray paint a basketball court using acrylic paint for a beautiful finish.
What Type Of Paint Is Best For Painting A Basketball Court?
Acrylic paint is the best type of paint to use for painting a basketball court. It is designed for use over asphalt, concrete, and existing acrylic surfaces.
Conclusion
Painting a basketball court is a rewarding project that can give you and your family hours of enjoyment. By following the right steps and using the correct materials, you can create a professional-looking court right in your own backyard. Start by preparing the surface and gathering all the necessary supplies.
Measure and tape out the court lines, then apply the paint using a roller or spray can. Once the paint has dried, remove the tape and add any additional border lines or key markings. The final step is to admire your hard work and enjoy playing on your newly painted basketball court.
Remember to use acrylic paint for a non-slip texture and choose a color scheme that fits your personal style. Now, grab your basketball and get ready to shoot some hoops in style!